Why bother to sequence your genome at home?
Curiosity
I own a Jetson Nano and Raspberry Pi, even though I can rent more compute in the cloud for less. The reason I am happy paying a premium for worse performing hardware, is that there is a special kind of pleasure I take in having a full system in front of me: I can touch it, I can change the OS, break it then reflash, and use it to build cool stuff.
I wish biology had felt that way when I was growing up. I loved it as a teenager - enough to spend money I made selling second-hand clothes on eBay on a print subscription to Nature. I suspect if I had been able to tinker with genetic circuits the way I tinkered with computers, I would have thrown myself into it completely.
Understanding inheritance
My family carries a high risk of autoimmune disease, and we still do not really understand why.
On Thursday night, my sister got a call from the Royal Free Hospital telling her that, after a two-year wait, a suitable liver had finally been found, and that she needed to leave for London within the hour. As I write this, she is now a day and a half post-op. One of her autoimmune diseases causes her immune system to attack the small bile ducts in the liver, so bile cannot drain properly and gradually scars the organ. She has yet to turn 40.
I am under no illusion that I am about to cure my family of its complex illnesses. If medical school taught me anything, it is that biology is complex, and learning to intervene in it predictably is more complex still. But I do want to begin to understand why, in my family, bodies seem to turn against themselves generation after generation.
How a nanopore reads DNA
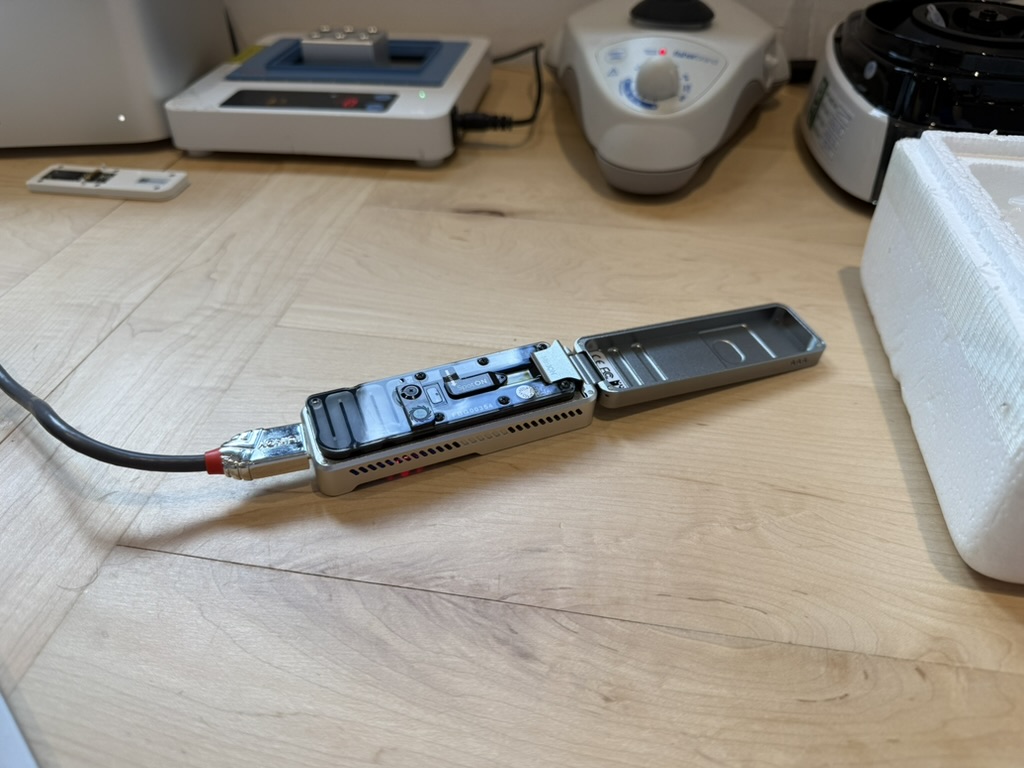
Before getting into the protocol, a quick word on the enabling piece of technology: the Oxford Nanopore MinION. It's a hugely impressive bit of engineering that I hold a degree of reverence towards. This protocol would not be possible without it - there is no other sequencer even remotely as compact and affordable.
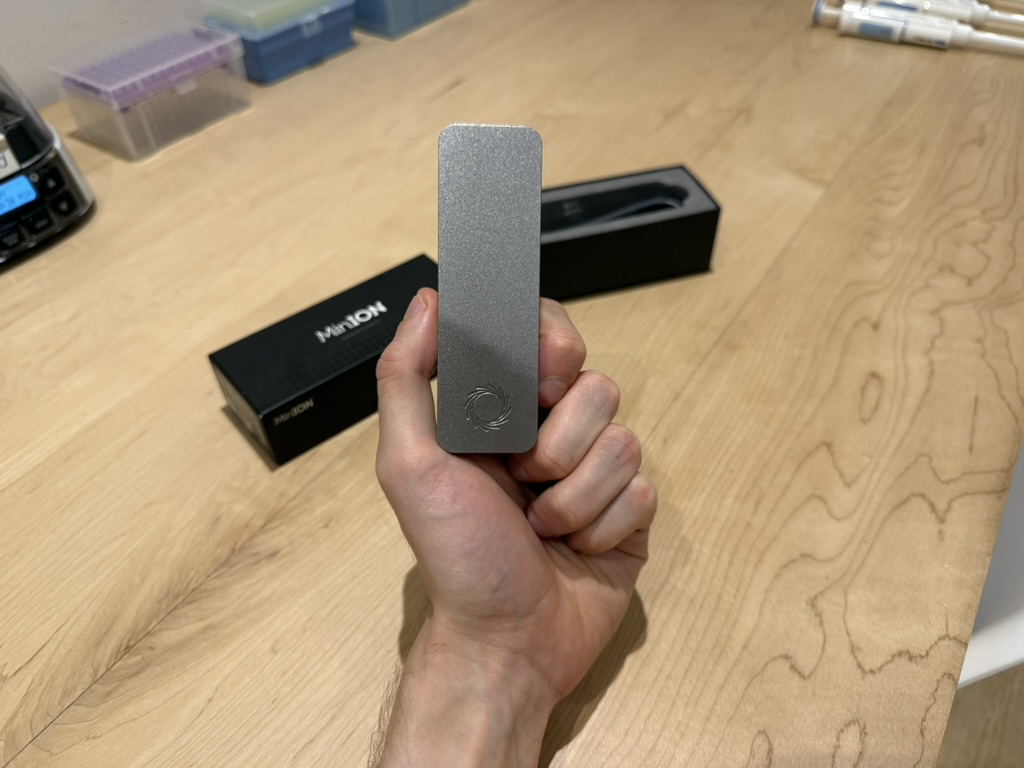
The MinION is a small rectangular box with a disposable consumable called a flow cell that slots inside. Inside the flow cell is a membrane shot through with about two thousand protein pores organised in a grid. Each pore is one nanometer across, which is wide enough for a single strand of DNA to thread through and not much else. A voltage is applied across the membrane. When you load your DNA sample, single strands start threading through those pores, and as each letter of DNA (A, C, G, or T) passes through the narrowest point, it changes the electrical resistance very slightly. A neural network listens to those current changes and reconstructs the sequence.
DNA is a string of four letters. A human genome is just over 3 billion of them. When a sequencer reads a piece of your DNA, it produces a "read" - a string of those letters. Nanopore reads are long: tens of thousands of letters each. Short-read sequencers (the kind a spit sample goes through at 23andMe) produce reads of only 150 letters (more correctly termed bases), which is a big part of why so many clinically interesting regions are hard to read with them.
Two thousand pores running in parallel for 48 hours produces about 30 gigabases (Gb) of sequence. Your genome is 3.2 Gb, so you get roughly 10 copies of it. That number - how many times each position in your genome gets read - is called coverage. More coverage is better, because every individual read has a small but non-trivial error rate, and reading the same position many times lets you vote on what the true base is.2 10x coverage means each base has been read ten times on average, which is enough to identify mutations common in the population (also known as variants). 30x is the accepted threshold for confident clinical-grade variant calling, both for short-read and long-read sequencing.3
Two ways to use one flow cell
I am going to assume the availability of a single flow cell for this protocol.4 Flow cells are expensive, and you can generate useful data with a single one. You have two realistic ways to spend that 30 Gb budget.
Option A: sequence your whole genome, shallow. About 10x coverage averaged across the whole genome. This is enough to call common variants - single-base changes from the human reference genome, present in at least 5% of people. It is not enough for confident calls on specific rare variants: to pick up, say, a pathogenic missense variant in CYP2D6 or BRCA1 that only ~1 in 1,000 people carry, you need to distinguish a real one-in-ten-reads signal from sequencing noise, and at 10x you can't. For that you need closer to 30x coverage, which requires aggregating data from multiple flow cells.5
Option B: sequence a small part of your genome, deep. Here nanopore has a capability no other sequencer has: it can decide, as it's running, which pieces of DNA to keep reading and which to throw away. It's called adaptive sampling, and mechanically it works as follows:
- Every fragment of DNA that starts going through a pore gets sequenced for about the first 500 bases.
- The sequencer checks those 500 bases against a reference genome and asks: is this fragment from a region I care about?
- If yes, it keeps sequencing. If no, it reverses the voltage on that pore, which physically ejects the strand, and a fresh fragment threads in.
You hand MinKNOW (ONT's control software running on your chosen device e.g. a Mac with an M3 chip) a list of regions you're interested in - a plain text file with one line per region, containing the chromosome, start position, and end position. The sequencer concentrates its 30 Gb of capacity on just those regions. If your regions add up to 1% of the genome, you get 30-50x coverage across them all instead of 10x spread thinly over everything.
Adaptive sampling is the reason a MinION at home seriously compelling. It's essentially free targeted enrichment: no custom DNA probes (the short synthetic sequences you'd otherwise need to design and order to pull your regions of interest out of a sample), no PCR, no specially designed library. If you care about a specific set of genes - say, pharmacogenes (how you metabolise drugs), autoimmune risk loci, cardiac safety genes, or the HLA region (which controls how your immune system sees the world) - this is the path.
This tutorial covers both. Most phases are identical. Only the setup and one MinKNOW toggle differ.
Picking a panel
The hardest part of adaptive sampling is picking which regions to enrich. Going from "I care about drug metabolism" to a BED file (a plain text list of chromosome/start/end for each region) that MinKNOW accepts means looking up gene coordinates, merging intervals, and handling edge cases.
The easiest way to do this is to sit down with Claude (or your language model of choice), paste in the ONT adaptive sampling PDF for context, and have a conversation:
- Ask it to identify the genes relevant to your clinical question. "I have a family history of autoimmune disease and want to look at pharmacogenes for immunosuppressants" gets you a list you can sanity-check against the literature.
- Ask it to generate the BED file - chromosome, start, end for each gene - in GRCh38 coordinates, padded ±100 kb for regulatory context, with overlaps merged.
- Ask it to sanity-check the total target size against the <5% enrichment constraint.
This is one of the best uses of an LLM in a project like this. The knowledge is scattered across UCSC, Ensembl, OMIM, and CPIC; an LLM can pull it together faster than you can.
It's closely related to what Patrick Collison has described doing with his own genome: spawning coding agents to investigate his specific mutations and propose follow-on screening. Panel selection is the upstream half of the same workflow. And at this stage you have no genomic data, so you can't expose this to anyone - you're only choosing which regions to read.
Stuff you need
The short version. The full bill of materials, with costs, pack sizes, and tip-by-tip breakdown, is on the bill-of-materials page.
| Item | Cost | Notes |
|---|---|---|
| MinION Mk1D sequencer | ~$3,200 | Reusable. |
| R10.4.1 flow cell FLO-MIN114 | ~$900 | One per run. Single-use. |
| SQK-LSK114 ligation kit | ~$100/rxn 6-rxn pack ~$610 | One reaction per prep. Preserves long reads. |
| NEBNext Companion Module v2 E7672S | ~$55/rxn 24-rxn pack ~$1,275 | Enzymes for DNA repair & ligation. |
| Monarch T3010 gDNA kit | ~$3/prep 50-prep pack ~$150 | Pulls DNA out of cheek cells. |
| Flow Cell Wash Kit EXP-WSH004 | ~$17/wash | Reload a half-spent flow cell. |
| Tips, LoBind tubes, ethanol, PBS | ~$50 | One-off consumables. |
| ~$1,100 per run |
Reagents come in bulk, and that is a problem. They're packaged for labs running many samples a week, not for someone doing a single prep at home.6 The LSK114 kit ships as a 6-reaction pack for ~$610, but you only need one reaction for your one flow cell. NEB's companion module is worse: 24 reactions per pack, of which you'll use one or maybe two.
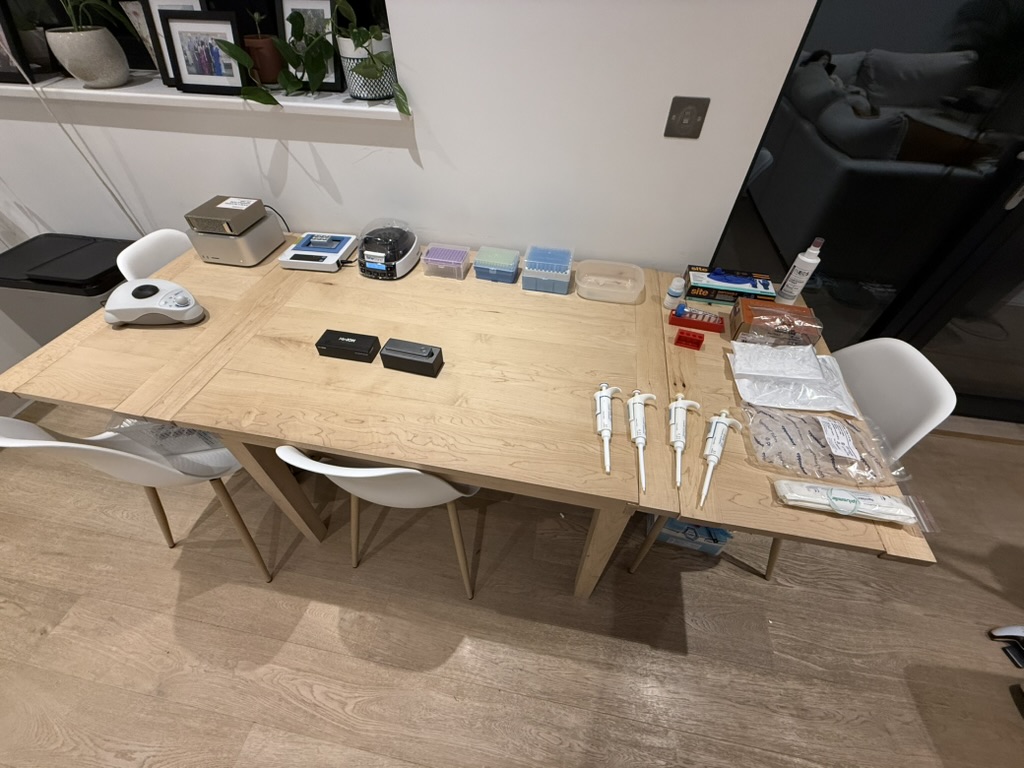
Instruments
You also need the basic hardware found in every biology lab: a heat block that holds 56 °C and 65 °C, a microcentrifuge to 12,000 g, a vortex, a magnetic rack for 1.5 mL tubes, and a set of pipettes from P10 to P1000.
There are three realistic ways to get this kit:
- Borrow from a friend with a working lab. The fastest route, and free, if you have a friend in academia or biotech. Ask.
- Buy used on eBay. Lab equipment has a long service life - a well-maintained vortex from 1985 performs identically to a 2026 model.7
- AliExpress. Basic versions of all of the above for dirt cheap - often cheaper than buying the same gear used on eBay. I saw this post recently, which makes the case that the Chinese kit is genuinely good - he kitted out a whole DIY lab at a fraction of Fisher or Sigma prices and reports no complaints.
The one instrument where precision actually matters is the pipettes. A heat block that reads 56 °C and delivers 58 °C is fine. A microcentrifuge that says 12,000 g and gives 11,000 g is fine. A vortex is a vortex. But a P20 that dispenses 18 µL when you've dialled 20 could ruin the latter stages of the run, and you won't know it's happened until the flow cell doesn't work. Buy refurbished-and-calibrated from Gilson, Rainin, or Eppendorf, or send cheap ones for calibration before first use.
On the tube rotator. The kit recommends a tube rotator ("hula mixer") that gently agitates samples during the 5-minute AMPure bead incubations. Not strictly necessary - I skipped it and manually flicked the tube every couple of minutes across each 5-minute incubation. Beads stayed in suspension and yield was fine.
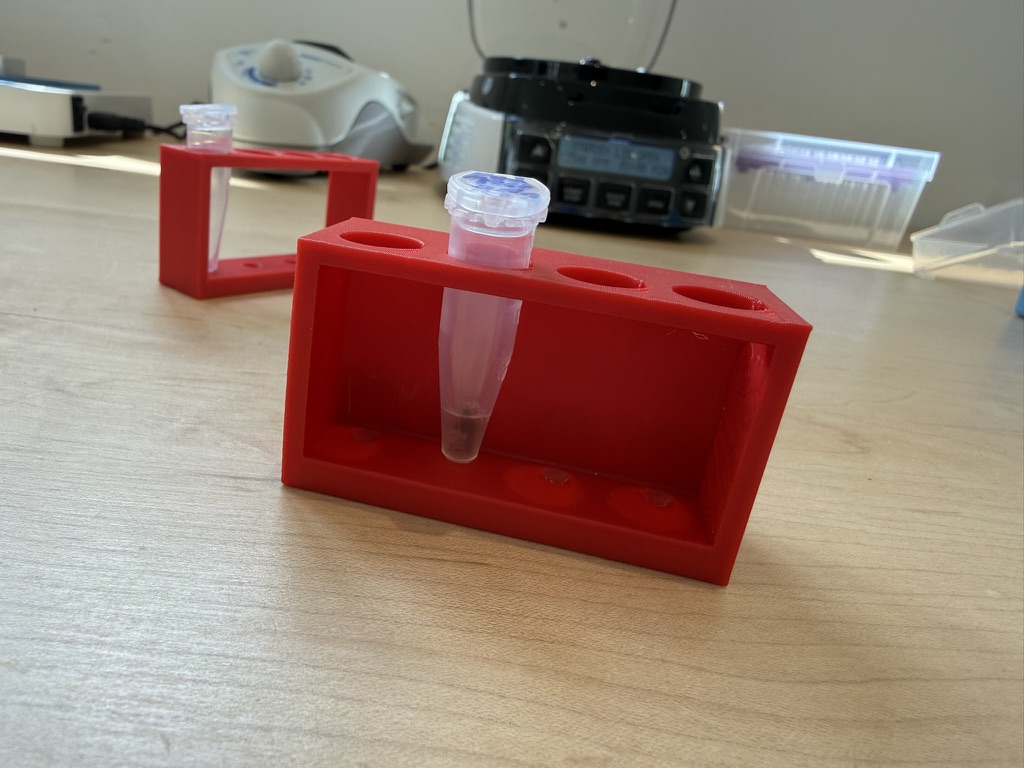
On the magnetic rack. You do need a magnet for the bead cleanups, but you don't need a proper rack. The simplest setup is a single strong neodymium magnet (N52) held against the side of the tube at the right moment - the beads collect on the wall and you pipette off the supernatant. If you want something neater, I designed mine in build123d (a Python code-to-CAD framework) and printed it on my Bambu A1 in an afternoon. The only cost was the neodymium magnets - about $7 from Amazon for next-day, basically free if you wait for AliExpress. The printed plastic is literally pennies.
If you need any help sourcing equipment I can help. Just drop me a message on Twitter - my DMs are open.
Compute
You need a computer to run the whole pipeline - the sequencer itself, live basecalling during the run, the adaptive sampling logic, and the post-run re-basecall. A recent Apple Silicon Mac (M3 or later, with enough RAM) is sufficient. I used an M3 Ultra Mac Studio. You will also need a lot of storage.8
If you happen to have access to an NVIDIA machine, the post-run basecall is dramatically faster. I have a DGX Spark available and benchmarked it against the Mac Studio: about 5× faster on HAC, 4× faster on SUP. For a single 30 Gb run that's the difference between a long evening and the next working day.
The protocol
Two canonical protocols, written by the companies that make the kits, cover the wet lab work end-to-end. You should refer to these at every step - they are the source of truth on volumes, incubation times, and conditions:
- NEB Monarch T3010 - DNA extraction from buccal swabs.
- ONT SQK-LSK114 - ligation-based library preparation and flow cell loading.
What follows is my overview of those two. I add a bit of theory to explain why each step matters, and the personal learnings I picked up running this at home that aren't called out in the manuals.
1. Setup
Before you even pick up a pipette, you should do the following:
- Install MinKNOW on the computer that will be plugged into the MinION. MinKNOW is ONT's control software: it drives the flow cell, runs the real-time basecalling, and handles the adaptive sampling logic. You download it from the Oxford Nanopore Community portal (free account). It runs on Mac, Windows, and Linux.
- Check the flow cell. The flow cell is the most expensive single consumable in the run and some of them arrive dead. Before you load any of your own DNA onto one, you need to confirm it's alive. Slot the flow cell into the MinION, let it sit for 20 minutes to warm up (cold flow cells give misleading readings), and run the pore check in MinKNOW. A fresh flow cell should have around 1,200 working pores; you want at least 800 before using it. If the number is below 800, claim the warranty before you load anything on it.
- Prepare the bench (or your preferred household surface). Wipe it down with 70% isopropanol. Label every tube you'll be using in advance with a Sharpie on the top - you'll be moving between eight or nine of them and it's easy to lose track. Pull the extraction kit and the sequencing kit out of the freezer and thaw them on ice (a polystyrene ice box works well - see the photo further down). The ligation and extraction kits both ship for storage at -20 °C, so before you buy them make sure you have a freezer that holds close to that.
- Adaptive sampling only. Prepare your BED file, which is the list of genomic regions you want the sequencer to enrich. Take your list of genes and look up their coordinates on the reference genome (GRCh38, the standard human reference, downloadable from Ensembl or UCSC).9 Total target size should stay below 5% of the genome so you can get over 30x coverage for your panel; under 1% works best. Upload the BED file and the GRCh38 FASTA to MinKNOW.
That's about 30 minutes of software, assuming nothing unusual. The rest is wet lab work.
2. DNA extraction
Your DNA lives inside your cells, tangled with protein and surrounded by a membrane. The job of extraction is to break the cells open, remove everything that isn't DNA, and end up with clean DNA in water. The enzymes in library prep are fussy: they don't work if there's leftover protein, detergent, or RNA floating around.
I used cheek cells.10 Blood would give better quality - longer fragments, higher DIN - but you'd need to actually take the blood, which can be tricky if you've not done it before and I can't in good conscience recommend that you try. Rub a sterile flocked buccal swab firmly against the inside of your cheek for ~60 seconds per side. ONT recommend the Isohelix SK-1S, but any sterile flocked cheek swab off Amazon works - go for the flocked kind (bristly filaments pointing outwards), not the cotton-wrapped ones, which release cells far less efficiently. One swab gets you 5–7 µg of DNA, comfortably above the 1 µg library prep needs. Drop the brush into 1 mL of cold PBS (a basic salt buffer) in a 1.5 mL tube, vortex 10 seconds to knock the cells off, remove the stick, spin at 2,000 g for 30 seconds to pellet the cells, pipette the PBS off the top leaving ~100 µL above the pellet, and resuspend by flicking. From there, follow the NEB Monarch T3010 buccal swab protocol: lyse with Proteinase K + RNase A + Cell Lysis Buffer at 56 °C, bind to the silica spin column, wash, and elute.
One thing the protocol underplays: pre-heat the Elution Buffer to 60 °C before the final elution. The difference between a clean 100–150 ng/µL eluate and leaving half your DNA stuck to the column.
Your eluate should be clear and colourless. Cloudy means salt carry-through - re-wash the column before library prep.
The protocols are explicit that QC matters at this stage - in particular, you should check you've actually extracted enough DNA before committing it to a library prep. The standard tool for measuring DNA concentration is a Qubit fluorometer - ~$500. I don't own one. This caused issues on my first run: I loaded what I thought was enough DNA and got poor pore occupancy, with no way to know whether the extraction had under-yielded or library prep had failed. The fix I'm building is DIYnafluor - an open-source fluorometer assembled from AliExpress parts for ~$80. I will post about this when I build it.
The other QC step is checking fragment length distribution, which I didn't do. I'm exploring using gel electrophoresis for my next run to check lengths, and will update this section once I have.
3. Library preparation
Your raw DNA can't go straight onto a flow cell. It has to be turned into a library - each fragment modified so it will thread through a pore and read correctly. Three things happen here. First, repair the ends: cell lysis leaves DNA fragment ends damaged, and repair enzymes polish them back to clean. Second, A-tail the ends: a single adenine base is added to each 3′ end so the adapter - which ends in a T overhang - can be ligated. Third, glue on a sequencing adapter: the adapter is what the pore grabs onto and it carries a motor protein that controls the speed DNA is pulled through. This is the critical bit.
A note on kit choice. ONT sells multiple library-prep kits. The rapid sequencing kit (SQK-RAD114) uses a transposase to fragment and tag DNA in a single step, which dramatically cuts the number of pipetting steps. I went with the ligation kit (SQK-LSK114) instead because, while it has more steps, it produces more predictable libraries and gets more total throughput out of a given flow cell. Since I'm trying to squeeze as much performance as possible from a single cell, the extra hands-on time was worth it for the higher yield and coverage.

Plan for about 70 minutes total, broken into four sub-steps in order: FFPE repair and end-prep (~25 min), a bead cleanup (~15 min), adapter ligation (~15 min), then a second cleanup with LFB (~15 min). The enzymes are expensive, fragile, and don't like being shaken - if you rush, the flow cell will be disappointing.
The SQK-LSK114 protocol has all the volumes, incubation times, and ordering. Four things it underplays - the bits that catch you out the first time:
- Don't vortex the enzyme mixes. They're formulated in glycerol; vortexing froths them and destroys activity. Flick the tube to mix instead.
- Ligation Buffer (LNB) is viscous. You can't vortex it into solution. Pipette-mix slowly, or you'll end up with a reaction that's nominally mixed but has invisible layers.
- Don't over-dry the AMPure bead pellet. 30 seconds of air-drying is plenty. Leave them longer and they crack and weld to the side of the tube - you'll lose DNA trying to recover them.
- Use Long Fragment Buffer, not ethanol, for the second cleanup. LFB preserves the adapter's motor protein; ethanol strips it off, and without a motor protein the adapter can't pull DNA through the pore.
- Be patient at the magnetic rack. Bead-pulldown speed depends on the strength of your magnet, its size, and how close it sits against the tube wall. Within a minute or two you should see a brown line forming at the back of the tube (the beads collecting against the wall) and the solution should start to clear. If neither has happened by ~2.5 minutes, your magnet probably isn't strong enough or isn't sitting close enough to the sample.
You should end up with 150–450 ng of library in 15 µL. Keep on ice. 12 µL is what goes onto the flow cell; the rest is your reload reserve if you do a mid-run wash.
4. Flow cell loading
Fifteen minutes, but the highest-stakes ones in the protocol. The flow cell is a $900 consumable and a single mistake - usually air pulled through the pore array - can kill enough pores to wreck the run. Before you start, watch ONT's priming and loading tutorial video end to end. THIS IS A MUST.
The protocol does not underplay this; it hammers on about it. I'm going to reiterate it anyway because it's that important: the thing most likely to wreck your run is air in the flow cell. One piece of practical advice on getting it out: you have to use a P1000 pipette for the draw-back, and if you've not used a pipette much before, controlling exactly how much liquid you pull can be fiddly. Rather than pushing the plunger down with your thumb to draw air out, dial the volume up by twisting the wheel - the suction this creates is much gentler and more controllable, and you're far less likely to overshoot and damage pores.
Do not let bubbles into the flow cell. If air gets pulled across the pore array, the affected pores go offline and never come back. On my first run I started sequencing and MinKNOW reported zero active pores - none of them lit up green. I opened the device and saw a bubble sitting next to one of the ports. Fortunately it hadn't reached the array yet, so I was able to draw it out without losing pores; if it had, the flow cell would have been bricked.
In practice, when you draw back storage buffer from the priming port, never exceed the 30 µL the protocol allows; when you load the priming mix and the library, dispense slowly enough that no air gets entrained behind the liquid. If you see a bubble forming, stop, draw it out, then continue.
5. Sequencing
OK, so the flow cell is seated firmly (good contact with the underlying electronic contacts), your sample is loaded, all the ports are covered, the blackout shield is over the array, the lid is closed, and the MinION is plugged into your computer. Now in MinKNOW, configure the run:
# MinKNOW run configuration
kit:             "SQK-LSK114"
flow_cell:       "FLO-MIN114"
basecalling:     "Dorado HAC @ v5.2.0, real-time"
adaptive_sampling:
  enabled:       true     # targeted path only
  mode:          "enrich"
  bed_file:      "./panels/pharmacogenes.bed"
  reference:     "./ref/GRCh38.fa"
Hit start. Leave unattended - but check in. A few things to watch on the MinKNOW dashboard.
Pore occupancy. The percentage of pores currently reading DNA. Drops over time as pores get blocked or die. If it falls below ~30% around the 24 hour mark and you have library in the fridge, run a nuclease wash (the EXP-WSH004 kit dissolves stuck DNA off the pores) and reload. That usually buys another ~24 hours.
Translocation speed. How fast DNA is being pulled through. Holds steady at about 400 bases/second. A sharp drop means damaged pores.
Read length distribution. Should look like what your extraction produced. Cheek cell DNA peaks around 4 kb.
Expected yield: 20–40 Gb of sequence across 48 hours on a fresh flow cell. If you're doing adaptive sampling, that budget concentrates onto your target regions, giving you 30–50× coverage on a ~1% panel.
6. Basecalling
What actually comes off the MinION is not DNA sequence - it's electrical signal. As DNA threads through each pore, the local current changes; MinKNOW captures these changes as a continuous waveform and saves them in ONT's binary signal format, called pod5. Turning pod5 into A/C/G/T text is called basecalling, and it's done by running the signal through a neural network trained to recognise which currents correspond to which bases.
ONT's basecaller is Dorado. Two model sizes matter. HAC (high-accuracy, ~99% per-base) is fast enough to run in real time during the sequencing run on a decent machine, and is the default. SUP (super-accurate, ~99.5%) uses a bigger neural net that is roughly 10× slower than HAC - worth running on clinically important regions only if you're tight on time.
Benchmark - two machines, 30 Gb run
In practice, on a decent Mac (M3 or better Apple Silicon) MinKNOW runs HAC live during the run, so by the time the flow cell finishes you already have a HAC-called BAM. SUP is too slow for live use - you re-basecall the saved pod5 signal afterwards if you want SUP-quality calls on specific regions, to pick up a newer Dorado model version, or to add methylation calls if you didn't enable them live. (If you happen to have an NVIDIA GPU, all of this is ~5× faster on HAC and ~4× faster on SUP, but you don't need it.)
What I actually do. HAC live during the run, then re-basecall the regions I most care about with SUP afterwards.
# basecall the whole run, HAC; -x auto picks CUDA on NVIDIA, Metal on Apple Silicon, CPU otherwise
dorado basecaller \
  -x auto \
  ~/models/dna_r10.4.1_e8.2_400bps_hac@v5.2.0 \
  ~/runs/2026-04-18/pod5/ > reads.hac.bam
The output is an unaligned BAM - a compact binary format for sequencing reads. Think of it as a zipped list of reads with their quality scores. Unaligned means basecalled but not yet mapped to the genome. If you used a methylation-capable model, per-base methylation calls are tucked into tags inside the BAM.11
7. Alignment and coverage QC
Basecalling gives you a pile of reads - strings of A/C/G/T with quality scores. Alignment figures out where in the genome each read came from. You feed a tool (minimap2 is the standard for nanopore) your reads plus a reference genome, and it tells you, for each read, the best-matching position: "this 4 kb read is 98% similar to positions 15,384,102 through 15,388,901 on chromosome 6."
# align, sort, index
minimap2 -ax map-ont --MD ref/GRCh38.fa reads.hac.bam \
  | samtools sort -o aligned.bam -
samtools index aligned.bam

# quality control
samtools flagstat aligned.bam                 # expect >95% mapped
mosdepth --by panels/pharmacogenes.bed cov aligned.bam   # per-target depth
If you were doing adaptive sampling, this is where you confirm you actually hit 30× across your panel.12 If you were doing whole-genome, check the average is close to your expected 10×.
Mission success: you have sequenced your genome.
aligned.bam is your genome. Around 30 Gb of reads, mapped to positions on the reference, with base qualities, per-base methylation, and enough information to tell which of your two parental chromosomes each read came from. From this file you can call variants (the places where you differ from the reference), phase HLA alleles, genotype pharmacogenes, or feed regions to a DNA language model to ask what it thinks they mean.
The things you can do with this file are vast, and I'm not going to try to lay out a full analysis plan here. In a future post I'll go through what I've chosen to do - including running my reads through DeepMind's AlphaGenome to see whether variants in non-coding regions, which have historically been hard to interpret, may have functional effects on my biology. For now, go and have fun and see what you can find out about your genome.
Want to try this yourself?
Doing this at home is very possible, but the logistics are annoying: reagents are sold in bulk, the MinION is expensive for a one-off run, and there are a few places (loading the flow cell, most obviously) where an avoidable mistake costs you $900.
I want to make this easier. I'm buying a batch of MinIONs to rent out, and splitting bulk packs into single-run reagent sets so you don't have to buy 24 NEB reactions for one go at your own genome.
And for anyone who would rather not run the protocol themselves but still wants their data to stay local, I'm happy to come and run the sequencing in person, entirely offline, bringing the MinION, reagents, and the rest of the equipment, and to leave you with the raw data on a USB stick when I'm done.
I'll probably ship rentals as single-run kits (one flow cell, LSK114 ligation reagents, AMPure beads, tips, tubes). In-person runs depend on travel - share your city in the form below and I'll come back with whether it's feasible and a ballpark date.